Tuesday, September 27, 2011

My new jacket!

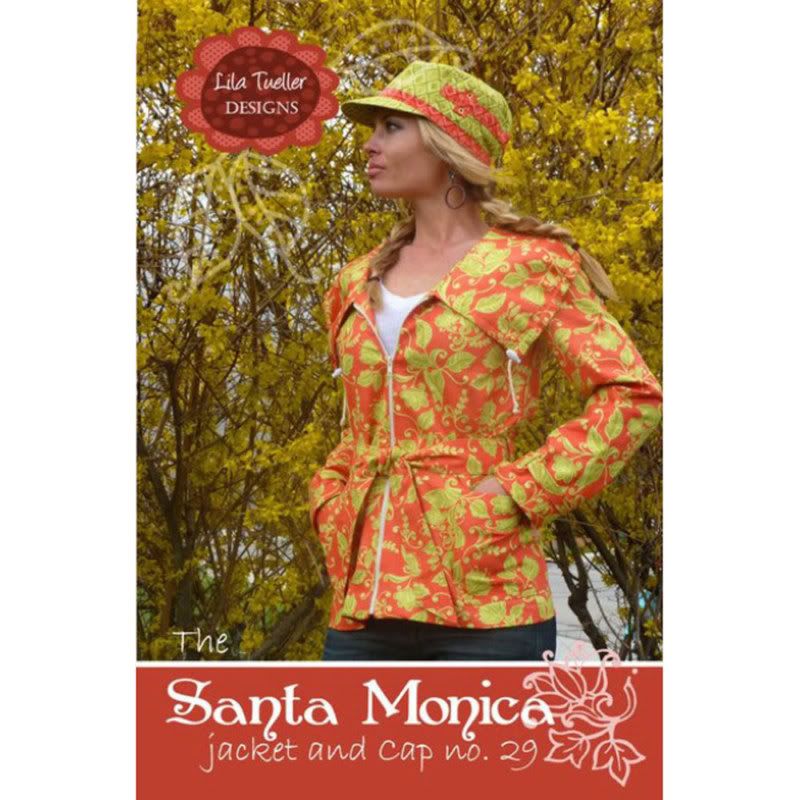
This spring I happened to be at Fabric Depot in Portland, Oregon and spotted the most darling jacket. It was a week or so prior to a big three week road trip our family was taking and I Thought it would be the perfect spring jacket to take along. While Fabric Depot is definitely a huge fabric store with tons of quilting cottons, they also seem to be stepping up their apparel fabric as of late and even have various garments displayed on dress forms throughout the department so you can get a close up look. This jacket was one of them and so I carefully tried it on to see what I thought. I was in love and just had to make it! The pattern was from a company I wasn't familiar with called Lila Tueller Designs, but since I was able to try it on in person and was happy with how it fit, I figured I'd give it a whirl.

Unfortunately the jacket wasn't anywhere near finished in time for our trip and was put aside after we got home at the end of May in favor of more summery patterns. With the weather turning fallish around here, I decided I better get it finished (I hate UFO's, don't you?). When I had last left off, I was having trouble with getting the sleeve in. Using the traditional methods never seem to work for me and always result in a puckered mess, this was no exception. Thankfully I had watched a wonderful webcast by the smart and talented Peggy Sagers of Silhouette Patterns about factory techniques for making blouses. In this webcast, she demonstrated how get a sleeve into a blouse in the most amazing and effortless way. I was sold and decided to try it on my recent UFO red blouse. It worked so awesome, I decided that I would try it on this jacket and by golly, it worked again like a charm!
The condensed version of how to set the sleeve in via Peggy's way goes like this:

1. Reduce the seam allowance of the sleeve cap and the bodice sleeve holes on your front and back bodice pieces to 3/8" (aka, shave off 1/4" seam allowance in those areas if you have a commercial pattern with 5/8" seam allowances).

2. Place the sleeve piece towards the machine bed and place the bodice piece on top.

3. Sew or serge in place!

The beauty of this method is that the feed dogs gather the fabric for you so there is no basting or fiddling required and you get a smooth sleeve! Now I have only tried this twice, but I intend to try it again soon when I make a desperately needed blouse. I'm not as gutsy as Peggy just serging it it right away as I did find comfort in finding the center point of the sleeve and pin it to the shoulder seam just to make sure everything stayed lined up and then sewing it on my sewing machine first before using the serger to finish the seam.

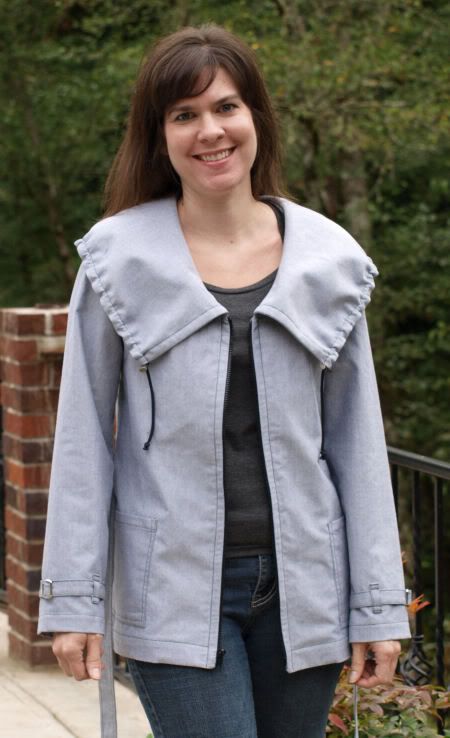
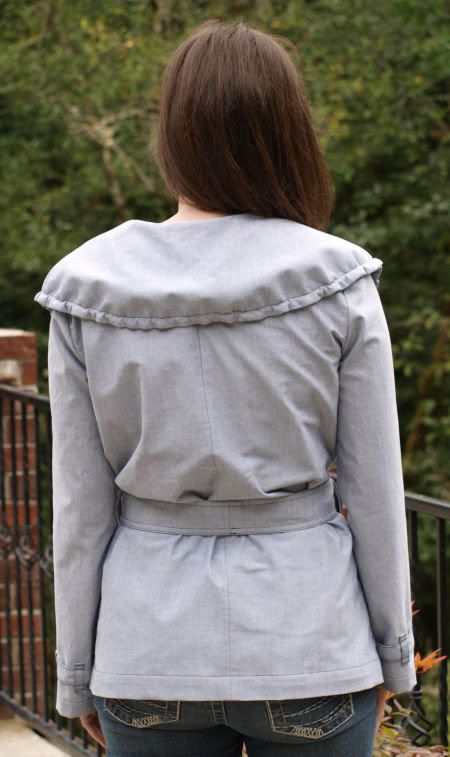
So here is the finished product. I'm super happy with how it turned out and think it will be a great fall and spring transition piece in my closet.

I did run into two errors while making the pattern, but directly emailed Ms. Tueller about them and found her to reply extremely quickly. She had added them to the correction page on her website, but the errors were:

1. The back facing says cut two on fold, but you only cut one.

2. The sleeve band piece says cut two on fold, but you cut two NOT on the fold. I did recut them this way, however I found them to be too short so I added about an inch to them. Upon another email with Ms. Tueller, I found out the sleeves are actually supposed to be a little gathered so if I would have gathered them, the length would have been perfect.
Here is a modified version of my review from Pattern Review:

Pattern Description: Ladies jacket with oversized collar and cap.

Pattern Sizing: xs to xl based on bust and hip sizes, I made a small.

Did it look like the photo/drawing on the pattern envelope once you were done sewing with it? Yes!

Were the instructions easy to follow? Yes, they are very clear with lots of professionally drawn diagrams and good instruction. The pattern is on the typical tissue paper.

What did you particularly like or dislike about the pattern? I saw this jacket at Fabric Depot in Portland, OR back at the beginning of May. It was in a pretty white summery fabric and hanging on a dress form. I instantly fell in love with it and decided to try it on and see what I thought. Once I tried it on, I knew I had to make it. We were leaving for a three week trip a week later so I had hoped to get it finished to take along. Well that didn't work out at all and am just now finally getting it finished. So what do I like about the design? I like the uniqueness of it. I love the big collar and how it's just a chic jacket that can be worn a lot of the year here in the Pacific NW.

Fabric Used: A chambray from the Lisette line at Joann's (it's a black & white weave).

Pattern alterations or any design changes you made: I made my usual 1/2" broad back adjustment. Also I didn't use all the bias tape to finish the seams. I started out doing that, but it frustrated me so moved to serging instead. I did finish the facing and hem with bias tape for a nice finish tho. Lastly, I really didn't care for her zipper instructions so I did it my own way.

Would you sew it again? Would you recommend it to others? Making this jacket feels like it took me an eternity, but in reality it really wasn't too bad to sew, I just drug it out for months and months. So yes, I'd definitely sew it again. It wasn't difficult by any means and the instructions are very complete. Yes, I'd recommend it if it's a style you're after.

Conclusion: Cute and unique jacket, just finally glad it's finished so I can wear it!

Wednesday, September 21, 2011

Simplicity 3503

One of my summer projects (after splurging for a few more yard of fabric at fabric.com - read after I sewed a few things I bought a dozen yards!), was Simplicity 3503. There are now 75 reviews on Pattern Review for this dress and I can see why. I've had it in my stash for a super long time and can't believe it's taken this long for me to sew it up. It's super cute and super simple to sew. Oh and it's beyond comfy to wear, yet looks a lot classier than sweatpants. And really, how can 75 ladies be wrong about a pattern? Isn't that the beauty of PatternReview?

Here is my review on this particular pattern:

Pattern Description: Designer's Inspirations evening and day knit dress in two lengths with bodice variations.

Pattern Sizing: 6-22, I made a size 8

Did it look like the photo/drawing on the pattern envelope once you were done sewing with it? Pretty much, tho I like mine much better.

Were the instructions easy to follow? Yes, very simple and straight forward.

What did you particularly like or dislike about the pattern? With 74 reviews (mine makes 75) and seeing Eugenia's many fabulous versions of this pattern, I just had to make it (doesn't she make such gorgeous garments?).

Fabric Used: An ITY border print from Fabric.com

Pattern alterations or any design changes you made:I made no changes, just planned out my dress with the border print. I do wish I would have used black for the contrast band at the waist, however I don't wish it bad enough to rip the dress apart to change it.

Would you sew it again? Would you recommend it to others?I made this dress nearly two months ago and was finally able to wear this yesterday to church because some cold, rainy weather came to visit us. I was so comfy, I ended up wearing it the entire day and really love it. I will probably make another dress with this pattern and would definitely recommend it (tho who needs my recommending it when there are lots of other gorgeous versions to get inspired with in the PR reviews).

Conclusion: Cute dress that is border fabric friendly (I used 1.5 yds with VERY careful placement) plus plain black poly/lycra jersey from my stash for the neck contrast. Fast to sew, tho I found the neckline inside facing to be a bit fussy and required me to hand sew it.

So how about you, have you made this dress yet? If so, do you love it at much as I love mine?

Monday, September 19, 2011

Good Bye Summer?

I'm going to spare the apologies for not staying up to date on my blog. I write when I feel compelled to share and as time permits and apparently neither of the two have lined up for quite some time.

While summer is officially over on Friday (boo hoo), we typically have later summers in the Pacific NW with gorgeous weather well into October. The perpetual joke around my area is that summer never starts until July 5th. Independence Day weather is always iffy and we can have gorgeous spring days, but lots of rainy spring days here too. It's definitely different than other parts of the country, but it's where I've always lived and I'm used to it. Since summer is so short here (at least I think it is when you hear about the long summers of the south), I really didn't sew much summer wear this year. I had high ambitions, but family, friends, & camping seemed to take over in rank. Plus we took a three week road trip in May that took us as far east as Colorado, so that pretty much took a whole month away for any sewing.

Looking back at my sewing journal, I have sewn 43 yards so far this year. Not too bad, but why does it seem for every yard I sew, I want to buy five more? Am I the only one? Please say it aint so! I'm not sure why I get so ambitious in the buying department, Lord knows I can sew faster in my head than in reality so I guess that is why!

I got two UFO's finished up in July. One was a blouse from Butterick 5025 and the other was a skirt from My Image magazine Spring/Summer 2011. I'm pleased with both garments. I have worn the blouse a few times, but feel like it needs to be a smidge longer to wear with jeans and the skirt is a fabulous staple in my closet for year round dressing. Here is the completed ensemble.


I need to take some photos of a few of the things I've sewn lately and share them. One of my favorites is Kwik Sew 3740, a cowl neck top. It's super cute and I think it just replaced my old stand by of Burda 10-2005-114. This is the envelope of the Kwik Sew pattern. And true to Kwik Sew, it's was definitely quick (and easy) to sew. I made two!


So are you ready for fall and fall sewing? I haven't made a plan of attack for sewing and I'm not sure if I will. I really want to make a nice wool coat and since I have several cuts of Vera Wang wool coating from Fabric.com (hmm, was that fall 2009 that they had the big bonanza there?), I don't have much of an excuse not to get one made. Share with me your fall sewing plans, I'd love some inspiration!

Thursday, February 03, 2011

LMB Cardi Take 2

Gosh, thanks for all the wonderful comments. I appreciate that I still have readers, tho like I have always told myself, I write on my blog to keep track of what I do (but sweet comments are icing on the cake!). It's fun to look back and see what I've accomplished as well as see how my skills have improved.

Another way I keep track of sewing projects is in my sewing journal. It's just a spiral notebook where I write about all my sewing projects. Do any of you do this too? In my notebook I write a few lines which include:
  • the date I finished the item

  • pattern used

  • view made

  • size used

  • alterations made

  • type of fabric used

  • amount of fabric used

  • how I liked the item

  • any other pertinent information I'd like to remember

My notebook really helps me keep track of things I sew and I often refer back to it. It's fun to calculate up how much yardage I sew in a year too. :-)

So a few weeks ago I was reorganizing my sewing stash one rainy Saturday afternoon and stumbled upon some black and white rib knit. I purchased it several years ago from a local indy store that was closing and had about 1/2 yard left. I immediately thought another LMB cardi would be perfect to use it up. With careful cutting I was able to get all the pieces I needed cut with some leftover to make matching double cuffs on the sleeves.


I originally made a size 40 nearly a year ago. LMB sizing is different than Burda and according to their size chart I should make a 38 in tops, but this particular one started at 40 so that is what I made. The other one was kind of big and not something I gravitate towards wearing in my closet. I think I don't like how floppy the rayon jersey is compared to the ribbing. So this time I decided I'd grade down to a 38 and use some poly/rayon/lycra ponte knit from Joann's for the base fabric. I made a 1/2" broad back alteration too to ensure I had enough room across the back. Ultimately I should have made a 40 again because the PRL doesn't stretch as much as the rayon jersey and it's a little tight in the arms when wearing it with anything that has sleeves. Hind sight is always 20/20, so now I know for next time. It doesn't really matter because I will still wear it, it just has to be with a sleeveless top under.


I also added a button this time and really like having a closure on it as well. In the picture we're going to church, but when I got home I put on some jeans and it looks so cute with it. I am always chilly so it's nice to have other pieces besides my usual Jalie hoodie. I also had enough fabric left over to make matching double ruffle sleeve cuffs. I thought this tied the cardi together better because the ribbing is a contrast compared to the base fabric. I'm very happy with how they turned out, but do wish I would have another 1/2" because they feel a little on the short side to me. I finished all the edges of ribbing with black woolly nylon thread by lettucing (is that even a word) on my serger.

Wednesday, February 02, 2011

Do you remember me?

I'm not sure if I can even remember how to create a post. Yes, I'm a terrible blogger. Okay, beyond terrible, I admit it. But atlas I won't beat myself up. I haven't been sewing a much as I wish, but there is always a time and place for everything.

Over the summer we camped a lot. My in-laws purchased a wonderful travel trailer that they have been so gracious to let us use as much as we want (direct quote from FIL - "I'd rather it be out being used than sitting in the driveway"). Okay, a camping we will go. We had never taken the kids camping (no throwing tomatoes at me please). Honestly, I hated all the work that was with tent camping even tho I adored it as a kid. I know, what a terrible disservice to not suck it up for the kids, but neither my hubby or I could stand the though of dew on a tent, cooking everything on a picnic table, dirt in our sleeping bags, etc. Life in the trailer on the other hand is like living in luxury. I honestly couldn't get enough and so we camped as often as we could until the end of October.

We are also now a homeschooling family. It has been something in the making for a long time. It's going extremely well for us, but it definitely cuts into my sewing time. ;-)

I have made some wonderful things, one being my first wool coat. I need to post a review about it, but I've been too busy wearing it everywhere to even think about posting a review. I did finally post a review about today about another item I finally finished up, so I thought I would share that. Not sure if I have any readers still, but here it is anyway. :-)

New Look 6628


( excuse the wrinkles on the sleeves, I've been wearing it all afternoon)


Pattern Description: Misses separates pattern that includes two styles of cardigan, sleeveless top, skirt, and pants all for knits.

Pattern Sizing: 8-18 ~ I made a size 8 my typical size for tops

Did it look like the photo/drawing on the pattern envelope once you were done sewing with it? Yes

Were the instructions easy to follow? Yes

What did you particularly like or dislike about the pattern? I found this pattern after reading a thread on the message board so it's been in my stash for quite some time now. I really liked the ruffles and the longer length cardigan. My only dislike (and it's not really even a dislike, it's more of an afterthought) is maybe I should have made the flounce go all the way around the neck. It's fine how it hangs, but I think I might like it better if it went all the way around and was one piece. I'm sure that would be a pretty easy fix if I do make this again and decide to go that route.

Fabric Used: grey Vera Wang wool jersey from fabric.com circa fall 2009

Pattern alterations or any design changes you made: I made a 1/2" broad back adjustment and also a small swayback tuck.

Would you sew it again? Would you recommend it to others? Yes I would. I'm very happy with how it turned out and have already wore in twice since I finished it. If it's the look you're after, then yes I recommend the pattern, tho it's been out of print for years so it might take some digging to find one.

Conclusion: I'm glad I finally finished this cardi. I started it in October, but kept forgetting to get some grey woolly thread for the lettuce edging. I finally remembered a few weeks ago and it took me under and hour to finish this UFO. My hubby said it reminded him of the puffy shirt Jerry wore in an episode of Seinfeld. I'm not sure if that is a compliment or not! ;-)

So any wagers on how long until I post again? Hopefully it won't be terribly long. I really like to sew and have enough fabric and patterns to keep me busy for a long time. I'm looking forward to being a football widow this weekend and hopefully have something to show for it by the time the game is over.

Tuesday, April 13, 2010

Pattern Review - La Mia Boutique Cardigan

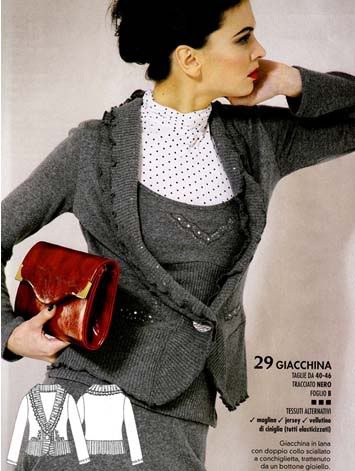
Pattern Review ~ La Mia Boutique Caridgan from 2/2010 issue #29


Pattern Description: Double ruffled collar ladies cardigan

Pattern Sizing: Italian sizes 40-46 - I made a 40, but my m'ments say I'm a 38 for tops. It's a little oversized, but for a cardigan I think that is okay, especially if you plan to wear something a little thicker under it. I might size it down to a 38 next time and see what I think. Also the fabric I used was a rayon/lycra jersey which is more drapy and relaxed than a cotton/lycra jersey so that will make a bit of a difference on the look you get.

Did it look like the photo/drawing on the pattern envelope once you were done sewing with it? Pretty much, they look like they used more of a sweater knit.

Were the instructions easy to follow? Well I followed Lynn's Instructions on Pattern Review so yes! I bought the March 2010 issue of Ma Boutique which is the French reprint of the Italian La Mia Boutique February 2010 issue. I don't read or speak either French of Italian so I would have have to muddle my way through if Lynn hadn't posted her instructions. If you've been sewing for any length of time I think you'd probably have no problems figuring it out on your own. I appreciated Lynn's efforts so I printed it out and read it before I started - thanks Lynn!

What did you particularly like or dislike about the pattern? It's such a cute and unique cardigan - what's not to love and since I'm always cold, I'm sure I'll wear it often!

Fabric Used: I used matching rayon/lycra jersey and cotton/poly ribbing both from Joann's

Pattern alterations or any design changes you made: I omitted the button because I didn't anticpate ever using it. Also, I did make an error when ruffling and had to redo the lower ruffle which ended up shaving off a bit more than it should. It's not bad, but the under layer should stick out a bit more. Also my top layer of lettucing isn't as lettuce-y as it should be but I'm hoping the washer will fix that. This was my first go round and I'm very pleased with the outcome even tho it's far from perfect.

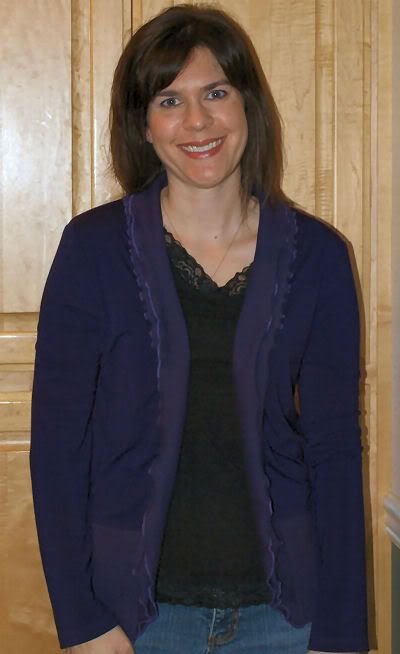
Would you sew it again? Would you recommend it to others? Yes, I'm sure I'll be sewing this again. It's a little tricky to find matching ribbing and knit, but Joann's actually had a decent selection when I went looking last week. I love purple, so it worked out perfect for me.

I'd definitely recommend trying the cardi if you have this issue in your collection.

Conclusion: Really cute cardi, I'm so glad this was brought to my attention on the PR message board. :-)

Monday, April 12, 2010

Pattern Review - McCalls 5974

McCall's 5974 ~ Palmer/Pletsch The Perfect Knit Dress


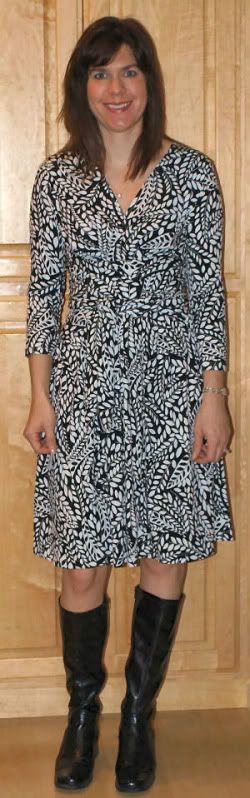
Pattern Description: Ladies knit dresses with scoop neck or mock crossover with self-ties. Bodice has front pleats, self-faced midriff, pleated skirt front, back zipper, and three lengths of sleeves. I made view "C" - the mock wrapover with 3/4 sleeves.

Pattern Sizing: 8-24W - I made size 8 based on my chest m'ment which is also my typical size for tops. Since the dress is fuller through the hips, I didn't alter the waist and hips for my m'ments.

Did it look like the photo/drawing on the pattern envelope once you were done sewing with it? Yes!

Were the instructions easy to follow? Yes, they were such great instructions. Having taking a Palmer/Pletsch fitting class from Marta in Fall 2008 and being a fan of the FFRP books by Pati & Marta, it was great to see the fitting addressed in the pattern sheets. The first sheet (both front and back) discussing tissue fitting, how to get the tissue ready for fitting, trying on the tissue, and common alterations you might have to make for this particular pattern. It is a mini FFRP course right in the pattern envelope! My only disappointment is they show how to make a FBA (full bust adjustment), but no SBA (small bust adjustment - they don't really discuss this to any length in the book either so I should be surprised).

Throughout the instructions there are helpful tips to guide the seamstress along so that the outcome is as professional as possible. The only thing I find utterly rediculous is that they don't have you put the sleeve in flat. This pattern is for knits only and they have you set in the sleeve - so dumb! One nice "tip" they offer is suggesting you try on the dress during the sewing process to see if you really need a zipper for your body shape. This is such great advice because putting a zipper in a knit dress is down right nuts (well unless you need it to be able to put it on).

One last interesting tidbit is that they give you 1" seam allowances in the sides to give you a little extra wiggle room when you're fitting.

What did you particularly like or dislike about the pattern? There are lots of positive reviews about this dress so I decided to give it a whirl. I really like the look of wrap dresses on my figure so I thought this might be a good on to have in my wardrobe. Beware, if you're making the mock wrap dress, it requires 2 5/8 yds - 3 5/8 yds depending on your pattern size ~ a hefty chunk of fabric.

Fabric Used: I used some poly/lycra knit I purchased at Joann's that was in my stash. I had almost 2.5 yds and was able to eek out the dress with no fabric to spare.

Pattern alterations or any design changes you made: I altered the pattern tissue by giving myself a 1/2" broad back adjustment and a slight swayback tuck. I also shortened the dress by 1". I probably didn't need to shorten it, but when I pinned it up that is where I liked it.

Would you sew it again? Would you recommend it to others? I might sew the dress again. It was easy to sew (took me about half a day or so from start to finish). I decided Saturday morning I should have a new Easter dress for church and then had it done by 3pm. This included doing a little tissue fitting as well to make sure the bust fit. Unfortunately it ended up being too big so next time I will make a SBA on my tissue. I should have known better, but the tissue fit well (duh the tissue is not knit! LOL). Thankfully it doens't gape open, it's just a little bit fuller in the bust area (I'm a 32B for reference).

Yes, I'd receommend the dress.

Conclusion: Cute knit dress with great pattern instructions.

Thursday, January 21, 2010

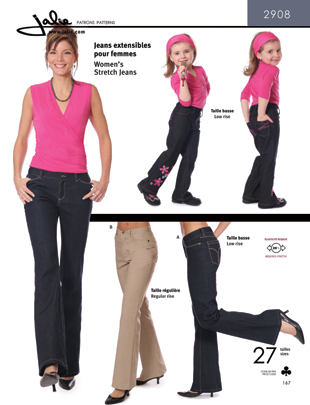
Pattern Review - Jalie Jeans #2908


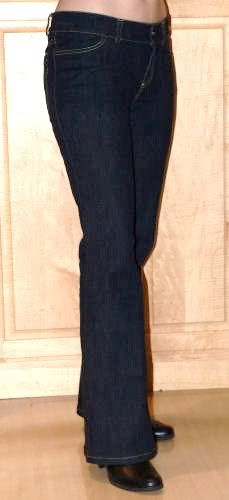
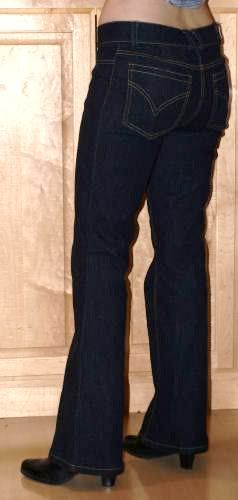
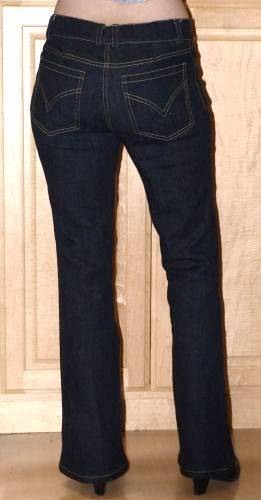
My finished product (photos lightened to show details better):


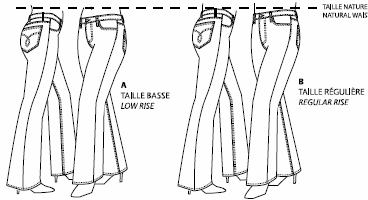
Pattern Description: Women's stretch jeans, slim fit through the hips and thigh with flared leg, back and side front pockets, zip fly with button closure. View A has low rise (2-3 inches below navel) and view B has a regular rise (at navel).

Pattern Sizing: This pattern comes in 27 sizes F - FF for girls age 2 up to a womens 52 inch hip ~ I made a size S in the lower rise version.

Did it look like the photo/drawing on the pattern envelope once you were done sewing with it? Absolutely!

Were the instructions easy to follow? Absolutely! Jalie *always* has excellent instructions that give you RTW results.

What did you particularly like or dislike about the pattern? Seriously, what is not to like about this pattern? Sorry to bore you all with another review, but I'm so happy with my jeans I just had to show them off! This is the best jeans pattern (IMO) that replicates RTW. If you want to make jeans at all, definitely give this one a try. I also like the huge range of sizes, however my DD is not at all interested in me sewing for her so I'm not sure if I'll use any other size than my own. I also love the cut of the leg. Bootcut is such a flattering style for just about anyone and this one does not disappoint.

Fabric Used: Stretch Denim from Joann's 98% cotton/2% spandex. This wasn't the suggested fabric on the pattern package, but my RTW jeans are all 99% cotton/1% spandex and I really like that type of denim best. I used a fun quilting cotton to line the pockets.

Notions used: I used Gutermann topstitching thread in a gold color to mimic the typical jeans topstitching, standard non-metal zipper, one button, and Palmer/Pletsch tailor interfacing for my waistband and light interfacing for the front fly zipper.

Pattern alterations or any design changes you made: I added a few inches to the length (I can't remember how much because I traced off the pattern several months ago). During construction I had to follow Emilie's gaposis fix for alter the back yoke and waistband for my swayback. I ended up taking out 3/4" in the yoke and then a 3/4" wedge in the waistband. It could still be a bit snugger, so I will work on tweaking the fit a little more.

I also cut the waistband on the cross grain instead of on the bias. I made my first pair back in Sept on the bias (and in a size bigger) and didn't see the reason for that except it wasted fabric. This time I cut it on the cross grain and interfaced for added stability and I liked the end result much better.

Would you sew it again? Would you recommend it to others? I will definitely be sewing these again and again. I made a size "T" back in Sept and really like them, but they are a bit too big for me. I finally got around to making another pair in a size "S" and the fit is much better for me, but I think I have a smidge of tweaking still. After that, I'll have a perfect jeans pattern for me and will be able to whip out a new pair any time I want to!

Yes, I definitely recommend this pattern!

Conclusion: Seriously, I finally have pants/jeans I'm proud to wear outside of my house - thank you Jalie!!!!!!!!!

Monday, January 04, 2010

bun in the oven


No not me silly, I made bread (after all I am Susie Homemaker, right?)! It's been rather dreary here in the Pacific NW, so I pulled out my Artisan Bread In Five Minutes A Day cookbook and made some bread today (actually I mixed the dough up last night - it took less than 5 minutes). I'm not kidding when I say this is easy peasy. You must try it even if you've never made bread before. The authors recently released a second book with all healthy recipes (aka made with whole grains).

The above bread is the boule from the "master" recipe in the original book. It's actually the only recipe I've made and I've had the book for over a year. I just love it so much and it's so darn tasty. And really, who doesn't like the smell of freshly baked bread all through the house?

Want to make your own? Grab the book (you might even check your local library) or use the basic recipe found here - the recipe starts on page 4.

I thought I'd show off my loaves in hopes of inspiring someone to try something new. Bread at the store can be so darn expensive and it's truly so simple and cheap to make.

Well it's back to sewing for me. I have two boys that need a few new pairs of pants, then maybe I'll get my turn for something new in my closet...fingers crossed!

Sunday, January 03, 2010

Featured

Michelle from Some Day Crafts featured my M&M pj's on her blog so I thought I should share a picture of my kiddos in their pj's. Her blog has lots of neat crafts, so if you're the crafty type check it out!


Friday, January 01, 2010

2009 Wrap Up

Well I had planned to put this up yesterday, but had trouble with my computer and then we lost power at 6:15 last night so it had to wait until this morning.

I was inspired by a few graphs I saw so I did a little tally of what I sewed in 2009. I have been keeping track of what I sew for a little over three years in a spiral notebook. It has come in handy so many times and it's also fun to look back and see what I've made.

In 2009, here is a breakdown of "who" I sewed for. As you can see, I wasn't in first place, instead it was all about the kids (go figure). The gifts were things I made for extended family members (ie not my own kiddos), mostly for Christmas gifts but some where birthday gifts and baby gifts too.

Here is the breakdown of pattern brand used. There are repeat patterns on here and KS is dominating because that is my go to PJ pattern. Also the "That Darn Kat" is the undies pattern I use for my youngest ~ you can see which ones in this post.

Another thing I notice is that I need to suck it up with my BWOF and Ottobre - seriously those magazines are expensive and if I'm not using them, then why the heck am I buying them? I have 5 years worth of BWOFs and 10 years worth of Ottobres - I should never be sewing anything else (or buying anything for that matter!). My Ottobre is up for renewal and I'm considering dropping it, but breaking up is so hard to do. I really look forward to getting the magazine, but with 10 years worth, can there really be something different and new making it worth the price each year? I still have a few weeks to ponder it. Have you had this struggle? If so, how did you decide?

Now on to my Christmas sewing. I sewed like crazy for the entire month of December and am so glad that is over. It was fun and a great idea, but it was so time consuming and overwhelming at times. A few of my favorite things I made are pictured below.

This is a pillow I made my sister. Why I like it so much is that she and my BIL acquired a business in 2008 called Acorn Uniforms in the Seattle area so it's rather fitting for them. It's a free pattern at YCMT if you want to make your own.


I also made three of these door hanging pillows to give as gifts. I wanted to make myself one, but ran out of time. I'm sure I'll make more of these, they are super easy and so cute. You can get this pattern free at YCMT too (can you see I have been using this site lately - it's really great!).

I always make the kids special pjs for Christmas Eve and really liked the prior year's matching snowman pjs. When I looked for matching fabric online this year, I didn't find anything that jumped out at me plus a lot of the Christmas knits were too girly. I really wanted to use fabric I had stashed and then it came to me - M&M pjs! My MIL collects all things M&M and all the kids have their "own" color so I decided to make them pjs in their M&M color! They were a hit and looked so cute IMO. I used this freezer paper stencil technique for the M's.

Up for 2010, not sure. I am not really a resolutions girl. I don't like making goals that I don't know if I'll keep. Heck, I have "to do" lists in my head each morning and most of the time I don't even get those all the way completed. I do know I really want to make myself a nice coat. I purchased some gorgeous wool coatings from Fabric.com in the fall so I have the supplies. I also want to make a trench with the Burberry fabric I purchased at PRW. Another pair or two of Jalie jeans are in order too. Lots of "wants" so I'll just keep plugging away and do my best while still enjoying my hobby. Oh and definitely using those BWOF (it will always be BWOF to me by the way) and Ottobre mags!

Wishing all my readers a healthy and happy 2010!

Tuesday, December 08, 2009

Christmas ideas

Learn fun and easy gift-giving ideas you can make!


My family decided to scale back Christmas this year. It seems to be getting out of hand and we really don't need more *stuff*. Most importantly, we wanted to make sure the true meaning of Christmas was vividly apparent during our celebration, not the commercialism that is so abundant. So in our quest to change things up a bit, we decided that we're going to try to include more handmade gifts under our tree.

At first we got a few wrinkled noses from the kids, but within minutes they were all very excited and making lists of what they could make each family member. Personally I wish my children were getting more handmade items from us, but when we decided this it was already mid November and being the planner I am, I already had several things purchased. What is really excited (at least to me), is my in-laws are participating too and we're only exchanging handmade things with each other.

Thankfully my husband has great mechanical and woodworking skills, so it won't be just me in my little sweatshop cranking out gifts - yep he's helping too, yeah! We'll also be making some things in the kitchen and the kids are excited about that (best to start them in the kitchen early, I hope their spouses thank me for that someday! LOL).

With all that, I wanted to share with you a blog that has lots of great, simple ideas for handmade gifts. If you're venturing down this road, you'll want to check it out ~ You Can Make This Blog. There are even short video clips too! Another blog with lots of ideas is Sew Mama Sew Blog in the handmade holidays section.

So what am I making you might wonder. I have pajamas all cut out for the kids for their Christmas Eve gift plus everyone is getting a few new sets under the tree. I also will be making them pillows, which I'll share with when I'm done. I made one for a baby gift and it turned out so cute. I have other ideas churning in my head and will share things as they are completed.

So are you making any Christmas gifts? Do you limit the number of gifts you give your children or do you have a set dollar amount? Share with me. The whole theory of scaling back is harder when the kids are bigger. They have expectations, but quite frankly I'm tired of this nonsense and so is my husband. We keep reminding them so hopefully there won't be any long faces on Christmas morning. I would like to think this is the beginning of a new season at our home, hopefully one we will continue to carry on for years to come (sounds like the ending of a Hallmark movie, huh?).

Tuesday, November 17, 2009

Learning something new.

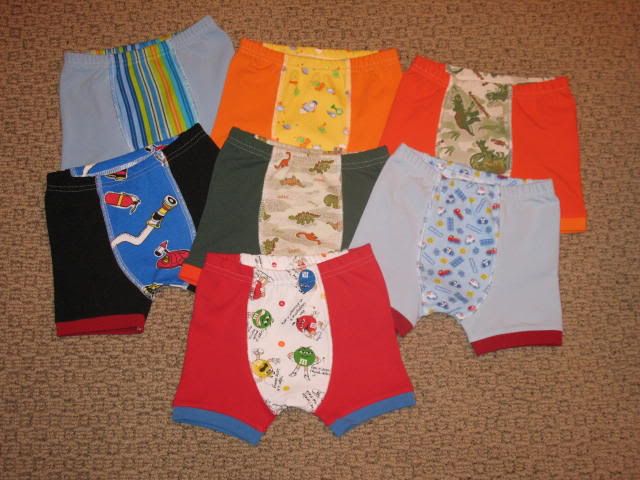
It's easy to get in a rut of doing things the same way. A creature of habit. My middle son was in desperate need of new undies (TMI I know). What started out as a fun way to use up scraps might have created a monster. My boys have been spoiled with mama made undies and they like them so much better than RTW - so much in fact that there are no RTW undies in the house for any of them. I do hope I haven't ruined them forever and they will expect their mom to make their undies when they are 50! ;-)

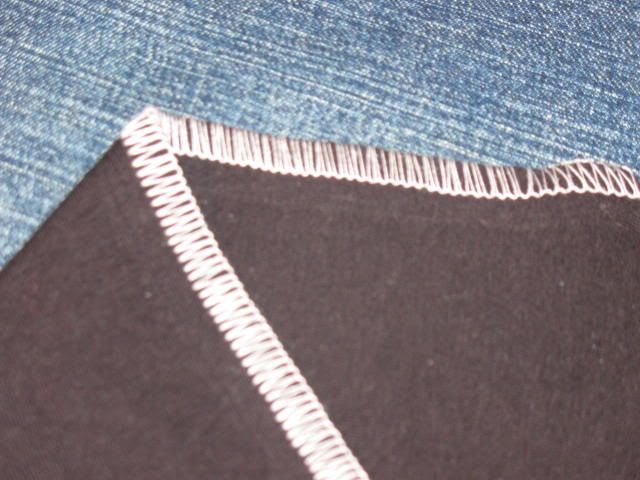
Back in August (gasp!), I cut out seven pairs and finally got around to sewing them up over the weekend. I used my trusty Ottobre Boxer Brief pattern and started sewing them how I had before (wrong sides together serged so the seams are on the outside, then zigzag the seams down from the outside so they lay flat). After doing two pair, it occurred to me that there has got to be a better way. Then a split second later I had my serger manual opened up to a flatlock stitch and knew that was just the ticket!

My serger rarely does anything but a four thread overlock. Occasionally it will do a rolled hem, but that is it. I even bought myself the book Serger Secrets years ago so I knew how to do all kinds of things with my serger. Unfortunately I feel like I don't have time to learn something new so I haven't made time to practice anything the book shows. I will say that I highly recommend it tho, it's jammed full of wonderful information (information I must store in my brain so I can use when the need arises).

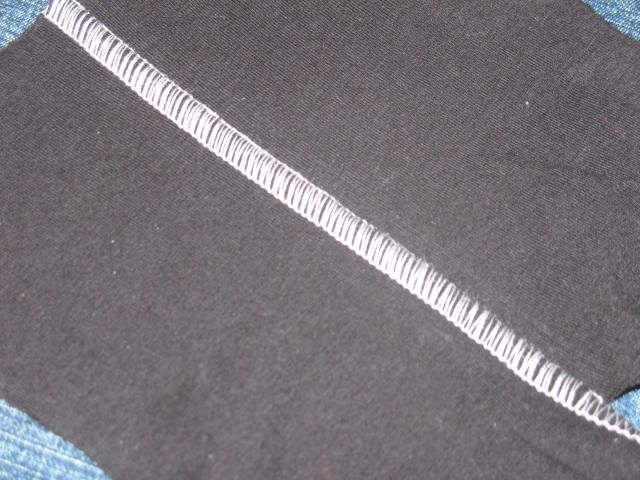
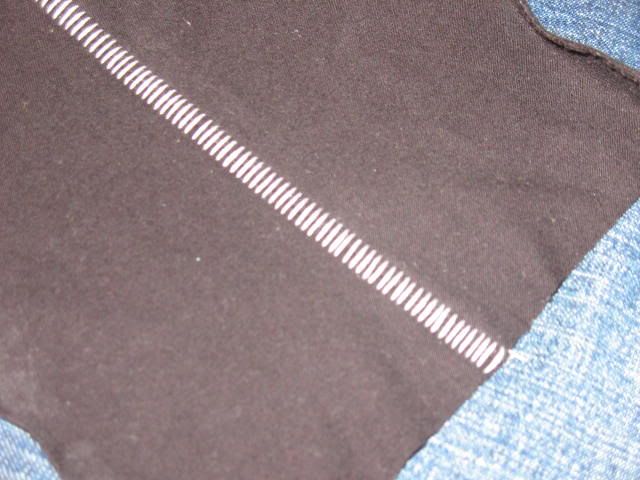
Back to my discovery. So I set my machine up for a 2 thread wide flatlock (hmm, that is what they meant by 2 thread, another discovery for me!) and proceeded to make some samples. I am happy to say, that flatlocking the pieces for the undies together worked like a charm and was so much faster than my original method. I was so excited that I called my BFF Kim to share the news and she said, well you are going to blog about it aren't you? - so here I am blogging about it and hoping to inspire someone to try out this great stitch. Here are some samples I stitched-

1) This shows the front and back side after you initially stitch it together.2) After you stitch the two pieces together, open the fabric up so you have one piece in each and and gently pull - voila, you have now pulled the seam allowances inside your flatlock. This is the view from the "looper" side (what I chose for my top side).3) And this is the view from the "ladder" side (what I chose as the backside for my project).
4) And here are the finished undies! :-)
I hope if you haven't played around with your serger, that you will now. I had fun trying this new stitch and am going to start trying some other techniques in the Serger Secrets book.

Up next? Just trying to make my Christmas sewing plans. I feel like I'm already leaving things to the last minute and I still have 5.5 weeks left. I have lots of pj's cut out so that is one thing I'll be sewing. Also I would like to make the two older boys sweatshirts. Then there is sewing I'd like to do for me - another pair of Jalie jeans (yes I know I didn't share that I made a pair back in Sept - love them!!!!), a coat/jacket or three...so many patterns, so little time.

Saturday, October 31, 2009

Happy Halloween!

Hope you had a fun and safe Halloween! My crew did and got enough candy to last a quite a while.


Fortune Teller Girl

Super Mario

Dan Druff the nerd

Mr. Train Conductor

This year I got off easy making costumes. I only made the Super Mario overalls and hat. I found a super easy tute for the hat so check it out if you need to make one for your kiddo. The "M" was a patch I made on my embroidery machine.

We lucked out and the rain ceased for the big Trick or Treat outing - thank goodness!

Monday, October 26, 2009

this is why...

I get NO sewing done! LOL The laundry is never ending at my house.

I'm so thankful we have clothes to wear so I'm not complaining. ;-)

P.S. There is one more load in the dryer and one in the washer too!

Sunday, October 25, 2009

i love my life

I say that with all sincerity. I love that I am able to stay home. My *job* is to care for my family and our home. There are many people who would rather have a career even after having children. I am not one of those. I always knew I wanted to be a wife and mommy. I am living MY dream and feel so blessed.

Once upon a time, I thought staying home would yield me some free time. Such *might* have been true after my daughter was born and I got over the sleep deprivation of having a newborn. Not so much at this stage of the game. The days turn into weeks, the weeks turn into months... yadda yadda. I know things will be different when my youngest goes to Kindergarten next year and I remind myself of that when I want to have my *own* time. That is going to be a life changing event for me having all my children in school and one I don't really relish just yet quite frankly.

I really like sewing. I think and dream of sewing a lot. Lately, unfortunately, I don't actually sew a lot. That makes me sad, but I know this is a season. I miss sewing. I have done a little here and there, but mostly my life consists of anything other than sewing. :-(

Enough of whining, let me be the *glass is half full person that I am* and share what I have accomplished. First off I kept my end of the bargain with my MIL and made her three beautiful skirts for her Italy trip. Sorry no pictures of that project, but I can say with certainty that she absolutely loves all three of them. They were the only thing she packed to wear on her bottom half for the 10 day trip. I was so happy she loved them that much. :-)

I also made myself a top I hated (Vogue 2980). I had made this before and the fabric was too spandex-y (is that a word?). I knew the fabric was part of the problem, but I thought sizing up might help too as that pattern seemed to run pretty small. If you know me IRL, you'd know I'm pretty cheap frugal and spending $4 on a pattern I already had would be silly. So instead I'd use 1/4" SA's in the side and underarm seams and see if that gave me a better fit. Well I think the fit was fine, but the fabric was a bad choice. It's too clingy and I feel self-conscious wear it. Will I try it again? I'm not thinking so even tho I love the style.

I did make the marvelous Jalie jeans. That will have to be a whole different post, but I will say I LOVE them! I have worn them many times already and plan to make another pair again soon. I have some modifications I need to make, but I can't even begin to say how thrilled I am with them.

I think that is all in the sewing department. I did get a lovely souvenir from Italy tho...


It's so fun to look at foreign pattern magazines. I sure wish I could get my hands on them regularly at an affordable price. I also got a yummy bar of Swiss chocolate too. :-)

My immediate "to do" list item is a pair of overalls for Halloween. My oldest son is going to be Super Mario and I can't find a pair in any thrift store to save my life. I've been to 12 and overalls just ain't out there. They are not popular anymore and you can't even seem to buy them at a retail level. If I would have planned ahead better maybe I could have scored a pair on eBay, but I didn't so now I'm sewing a pair. Thank goodness I have Ottobres galore. I found a pair in one of the early non-English issues. They were a few sizes too small, but I sized them up and they look like they'll fit just fine so I'll be working on those this week. Have I mentioned that Halloween is really my least favorite holiday? I'd rather buy the kids each a bag of candy and do something fun (bowling, movies, etc). Such a party pooper huh?

Tuesday, September 01, 2009

13 years of bliss


Yesterday my husband and I celebrated our 13th wedding anniversary. We had actually went out to dinner the night before while our children went to sleepover at the Grandparent's house, but didn't know we were going to be in for such a treat on our actual anniversary day.

When the kids came home, our sweet daughter has a surprise dinner prepared for us. I stayed downstairs in my sewing room until it was time for our dinner (she had to bake the entree). With very little help from my MIL, she prepared us a four course dinner. For our appetizer we had chips and salsa (a favorite in our house!), then we had a nice salad followed by some of the yummiest enchiladas I've ever had (seriously, I'm totally being truthful!), and then for dessert some delicious chocolate cake with a sweetened sour cream filling. She also picked out some tasty sparkling cider for our drink too.

The little miss got all dressed up in a dress to be our server and set up a card table in our living room for us to dine at. She made the "brothers" promise to stay outside and eat the dinner she prepared for them ("big noodles" a family favorite of the kids) and they even cooperated for her (and us). She lovingly and carefully made a beautiful table presentation, picked flowers, made up placecards, folded the napkins, added a candle for ambiance, had "romantic" music playing in the background, and even hung a sheet over the doorway so we could have privacy while we dined. It was a lot of fun for us and we really enjoyed ourselves. Our wonderful server even earned a $5 tip from dear ol' dad! Thank you for the wonderful dinner sister, we really enjoyed it!!!

I find it hard to believe we've already been married 13 years, but on the other hand I can't believe it's only been 13 years. Happy Anniversary sweetie, looking forward to sharing the rest of my life with you!

In "sewing" news, well not a whole lot is happening. I made a red Jalie hoodie that I really like, but am also in the midst of a "sewing for hire" project. While I usually don't take on such tasks, I did a little bartering with my lovely MIL. I'm making her a few skirts to take on her upcoming trip to Italy and when she returns from said trip, she's going to shampoo my carpets (both upstairs and downstairs). It's a hot deal for both of us and I'm totally pumped about it!

The kids are heading back to school tomorrow, so maybe I'll have some more sewing time. Summer has been a whirlwind of busy for our family, so I am looking forward to things slowing down, tho I would still like to keep the warm summer weather for a bit longer.

Friday, August 14, 2009

Sewing Pants

Last week I was asked by my sister's friend Joanna to write a guest blog post on sewing pants. I explained to Joanna that I am totally not qualified to write a post on sewing pants, but answered a few questions for her and she replied that is the exact information her readers wanted to know. They are all crafty sewers and just wanted to do a little pants sewalong and needed some basic knowledge. Basic knowledge I have, so I figured that I could share that with her readers. I decided to add the post here too because maybe someone else who is just starting to sew pants will find it helpful, so here ya go. :-)

Hi, I'm Melissa from Susie-Homemaker and Joanna has asked me to guest blog a post on sewing pants. Honestly I'm not sure I'm qualified to type this post, but like I told Joanna in my email, I really just sew by the seat of my pants and figure it out as I go. When I'm stumped, I consult Google, my shelf full of sewing books, and favorite sewing message board Pattern Review, but mostly I just wing it and learn from my mistakes.

I have quite a bit of pant sewing experience under my belt thanks to my four children. I enjoy sewing for them because they are easy to fit. Me on the other hand, I'm still on a quest to sew pants that fit me perfectly. I don't fit the classic "perky thin 20-year-old-Barbie-doll body type model" that pattern makers draft for, but what woman does? A quick look around in any public venue and you'll see that body type does not depict your typical woman's curvy figure. I make a point to note this because sewing pants is the easy part, getting them to fit how you like, well that is another story and one I'm definitely not qualified to write about. Okay, on to sewing by the seat of our pants!

So what kinds of fabrics do you sew pants from? The easy answer is anything you want. Of course use this guide within reason. Most people don't sew pants from a sheer lightweight fabric, but if you really wanted to you could. Some popular choices for sewing pants include denim, twill, corduroy, and linen. If you're using a commercial pattern, you'll find a list of suggested fabrics on the pattern envelope. Definitely use that information as a guide because it will help you recreate the look you see on the pattern envelope ~ too stiff or too drapey and you'll ruin the look.


Fiber content is also something to think about when choosing fabrics. Natural fibers breathe well and allow airflow to circulate more easily (think cotton, wool, silk, linen). Man-made fibers, such as rayon, also breath well because they comes from a natural source (wood pulp in the case of rayon) and aren't chemically created. Synthetic fibers come from a chemical source and are chemically processed to create the fiber. Examples of synthetics include polyester, nylon, acrylic, and spandex. The major downfall of synthetics is they have no wicking quality and are often hot to wear. On the plus side, synthetics are machine washable, resist wrinkling, and usually hold their shape well. Want the best of both worlds? Look for blended fibers. A great example which many of us probably have in our closet is stretch denim. The comfort of cotton with the recovery of spandex makes for a fabulous pair of jeans that don't bag out the minute you sit down.

What about needles and stitch length? This all depends on the fabric you choose. A light weight fabric will require a small needle while a heavyweight fabric needs a larger needle that will penetrate the thicker fabric and not cause stress on the thread which can cause it to fray or break. As a general guide, lightweight fabric you'll use 60/9 or 70/10 with a stitch length of 1.5-1.7mm, a medium weight fabric 70/10 or 80/20 with a stitch length of 2-2.5mm, heavyweight fabric 90/14 or 100/16 with a stitch length of 2.5-3mm, and then a very heavyweight fabric 100/16 to 120/20 with a stitch length of 3-4mm. To ensure you're using the correct needle and stitch length, create a few samples with your fabric scraps before beginning your garment.


Another question that comes up regarding needles is what type. I found a very helpful post on the Sew Mama Sew blog so I'm going to refer everyone to that so I don't reiterate the same information. Worth adding is a little information about stretch needles. Stretch needles are actually a better choice when sewing fabrics with spandex (aka Lycra) because they have a deeper scarf that prevents skipped stitches. I have personally had skipped stitches using a ball point needle, but once I switched to a stretch needle the problem has been solved. Here is another helpful reference for choosing needles.

What about thread? For stitching seams, a basic all-purpose thread is perfect for most of your sewing needs. I typically use Coats & Clark Dual Duty XP which I buy at Joann's. When I topstitch hems or pockets, I use the same all-purpose thread when I want everything to blend together. Other times I want thicker topstitching thread to highlight those areas (hems, pockets, etc), so I use Gutermann topstitching thread (also at Joann's). While I don't recall the price of the spool, it has 110 yds and comes in several different colors including a nice blue jeans gold (#1870). When I topstitch, I have personally used a regular sewing machine needle, but after doing a little research for this post, I see I should really be using a topstitching needle because they are made for thicker topstitching thread (note to self!). Sometimes you'll have to loosen the thread tension to get the bobbin and the needle thread to balance out so it's best to practice on scraps first. Also, I personally use all-purpose thread in my bobbin when I topstitch because it feeds better (at least in my machine) than the thick topstitching thread. I think that you're really only supposed to use lighter weight threads in your bobbin case, but consult your manual or your dealer for what is correct for your machine.

Before I close, I'd like to share a few links of things you might find helpful for the sewalong. Here are two articles ~ Making Perfect Pants and Sewing Instructions for Women's Pants. And if you're interested in learning to better fit your clothes to your body shape, I highly recommend two books by Pati Palmer & Marta Alto ~ Fit For Real People and Pants for Real People. Lastly, there are two books I have in my sewing library that are great pants reference books ~ Easy Guide to Sewing Tops, T-Shirts, Skirts, and Pants & Sewing Pants That Fit (this one is a bit dated, but has good information on sewing and fitting pants).

Thank you Joanna for asking me to be a guest. I hope the information I shared will be useful. My best advice is don't think about it too much. I get caught up in thinking too much and sometimes I think the best things happen when you just roll with it and really just sew by the seat of your pant. Happy sewing!