Showing posts with label Tutorial. Show all posts

Tuesday, November 17, 2009

Learning something new.

It's easy to get in a rut of doing things the same way. A creature of habit. My middle son was in desperate need of new undies (TMI I know). What started out as a fun way to use up scraps might have created a monster. My boys have been spoiled with mama made undies and they like them so much better than RTW - so much in fact that there are no RTW undies in the house for any of them. I do hope I haven't ruined them forever and they will expect their mom to make their undies when they are 50! ;-)

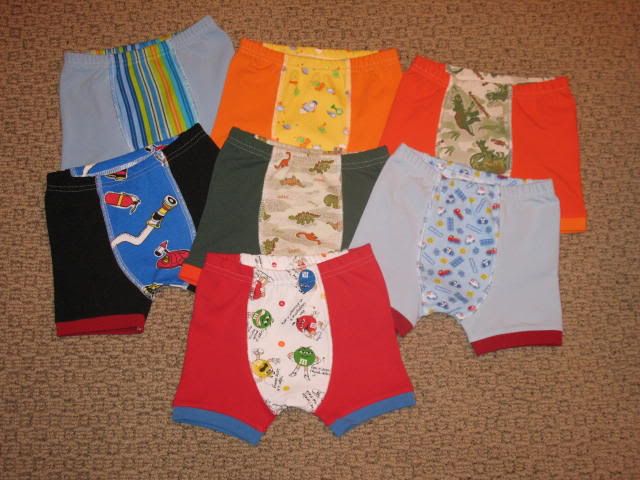
Back in August (gasp!), I cut out seven pairs and finally got around to sewing them up over the weekend. I used my trusty Ottobre Boxer Brief pattern and started sewing them how I had before (wrong sides together serged so the seams are on the outside, then zigzag the seams down from the outside so they lay flat). After doing two pair, it occurred to me that there has got to be a better way. Then a split second later I had my serger manual opened up to a flatlock stitch and knew that was just the ticket!

My serger rarely does anything but a four thread overlock. Occasionally it will do a rolled hem, but that is it. I even bought myself the book Serger Secrets years ago so I knew how to do all kinds of things with my serger. Unfortunately I feel like I don't have time to learn something new so I haven't made time to practice anything the book shows. I will say that I highly recommend it tho, it's jammed full of wonderful information (information I must store in my brain so I can use when the need arises).

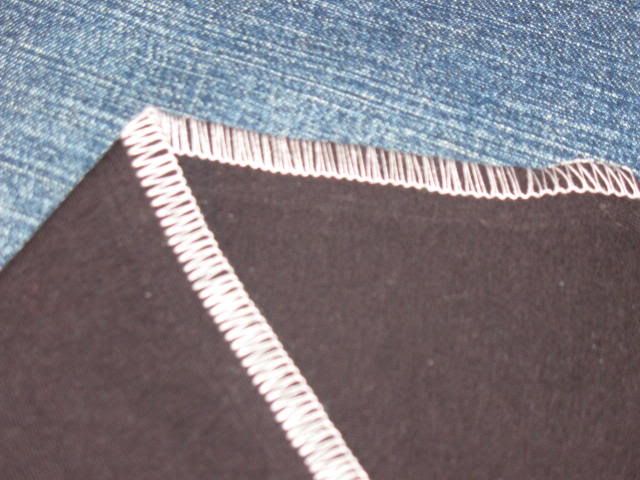
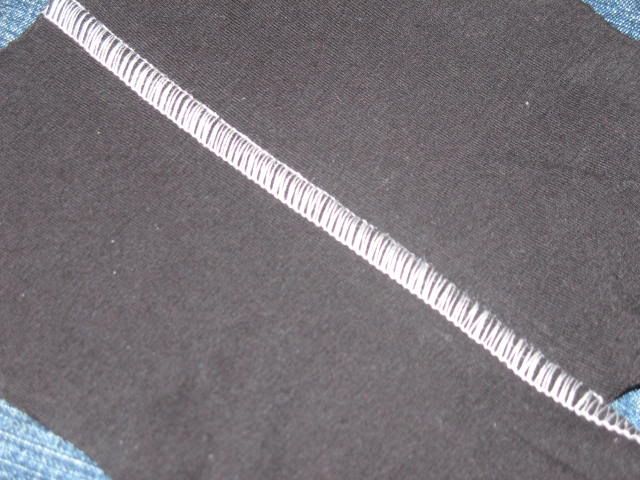
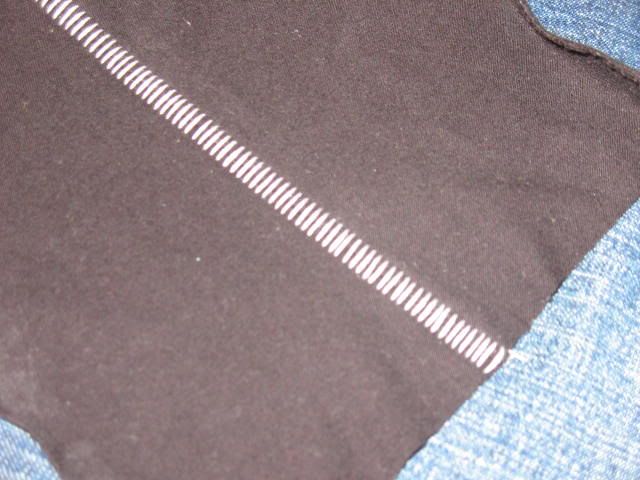
Back to my discovery. So I set my machine up for a 2 thread wide flatlock (hmm, that is what they meant by 2 thread, another discovery for me!) and proceeded to make some samples. I am happy to say, that flatlocking the pieces for the undies together worked like a charm and was so much faster than my original method. I was so excited that I called my BFF Kim to share the news and she said, well you are going to blog about it aren't you? - so here I am blogging about it and hoping to inspire someone to try out this great stitch. Here are some samples I stitched-

1) This shows the front and back side after you initially stitch it together.2) After you stitch the two pieces together, open the fabric up so you have one piece in each and and gently pull - voila, you have now pulled the seam allowances inside your flatlock. This is the view from the "looper" side (what I chose for my top side).3) And this is the view from the "ladder" side (what I chose as the backside for my project).
4) And here are the finished undies! :-)
I hope if you haven't played around with your serger, that you will now. I had fun trying this new stitch and am going to start trying some other techniques in the Serger Secrets book.

Up next? Just trying to make my Christmas sewing plans. I feel like I'm already leaving things to the last minute and I still have 5.5 weeks left. I have lots of pj's cut out so that is one thing I'll be sewing. Also I would like to make the two older boys sweatshirts. Then there is sewing I'd like to do for me - another pair of Jalie jeans (yes I know I didn't share that I made a pair back in Sept - love them!!!!), a coat/jacket or three...so many patterns, so little time.

Friday, August 14, 2009

Sewing Pants

Last week I was asked by my sister's friend Joanna to write a guest blog post on sewing pants. I explained to Joanna that I am totally not qualified to write a post on sewing pants, but answered a few questions for her and she replied that is the exact information her readers wanted to know. They are all crafty sewers and just wanted to do a little pants sewalong and needed some basic knowledge. Basic knowledge I have, so I figured that I could share that with her readers. I decided to add the post here too because maybe someone else who is just starting to sew pants will find it helpful, so here ya go. :-)

Hi, I'm Melissa from Susie-Homemaker and Joanna has asked me to guest blog a post on sewing pants. Honestly I'm not sure I'm qualified to type this post, but like I told Joanna in my email, I really just sew by the seat of my pants and figure it out as I go. When I'm stumped, I consult Google, my shelf full of sewing books, and favorite sewing message board Pattern Review, but mostly I just wing it and learn from my mistakes.

I have quite a bit of pant sewing experience under my belt thanks to my four children. I enjoy sewing for them because they are easy to fit. Me on the other hand, I'm still on a quest to sew pants that fit me perfectly. I don't fit the classic "perky thin 20-year-old-Barbie-doll body type model" that pattern makers draft for, but what woman does? A quick look around in any public venue and you'll see that body type does not depict your typical woman's curvy figure. I make a point to note this because sewing pants is the easy part, getting them to fit how you like, well that is another story and one I'm definitely not qualified to write about. Okay, on to sewing by the seat of our pants!

So what kinds of fabrics do you sew pants from? The easy answer is anything you want. Of course use this guide within reason. Most people don't sew pants from a sheer lightweight fabric, but if you really wanted to you could. Some popular choices for sewing pants include denim, twill, corduroy, and linen. If you're using a commercial pattern, you'll find a list of suggested fabrics on the pattern envelope. Definitely use that information as a guide because it will help you recreate the look you see on the pattern envelope ~ too stiff or too drapey and you'll ruin the look.


Fiber content is also something to think about when choosing fabrics. Natural fibers breathe well and allow airflow to circulate more easily (think cotton, wool, silk, linen). Man-made fibers, such as rayon, also breath well because they comes from a natural source (wood pulp in the case of rayon) and aren't chemically created. Synthetic fibers come from a chemical source and are chemically processed to create the fiber. Examples of synthetics include polyester, nylon, acrylic, and spandex. The major downfall of synthetics is they have no wicking quality and are often hot to wear. On the plus side, synthetics are machine washable, resist wrinkling, and usually hold their shape well. Want the best of both worlds? Look for blended fibers. A great example which many of us probably have in our closet is stretch denim. The comfort of cotton with the recovery of spandex makes for a fabulous pair of jeans that don't bag out the minute you sit down.

What about needles and stitch length? This all depends on the fabric you choose. A light weight fabric will require a small needle while a heavyweight fabric needs a larger needle that will penetrate the thicker fabric and not cause stress on the thread which can cause it to fray or break. As a general guide, lightweight fabric you'll use 60/9 or 70/10 with a stitch length of 1.5-1.7mm, a medium weight fabric 70/10 or 80/20 with a stitch length of 2-2.5mm, heavyweight fabric 90/14 or 100/16 with a stitch length of 2.5-3mm, and then a very heavyweight fabric 100/16 to 120/20 with a stitch length of 3-4mm. To ensure you're using the correct needle and stitch length, create a few samples with your fabric scraps before beginning your garment.


Another question that comes up regarding needles is what type. I found a very helpful post on the Sew Mama Sew blog so I'm going to refer everyone to that so I don't reiterate the same information. Worth adding is a little information about stretch needles. Stretch needles are actually a better choice when sewing fabrics with spandex (aka Lycra) because they have a deeper scarf that prevents skipped stitches. I have personally had skipped stitches using a ball point needle, but once I switched to a stretch needle the problem has been solved. Here is another helpful reference for choosing needles.

What about thread? For stitching seams, a basic all-purpose thread is perfect for most of your sewing needs. I typically use Coats & Clark Dual Duty XP which I buy at Joann's. When I topstitch hems or pockets, I use the same all-purpose thread when I want everything to blend together. Other times I want thicker topstitching thread to highlight those areas (hems, pockets, etc), so I use Gutermann topstitching thread (also at Joann's). While I don't recall the price of the spool, it has 110 yds and comes in several different colors including a nice blue jeans gold (#1870). When I topstitch, I have personally used a regular sewing machine needle, but after doing a little research for this post, I see I should really be using a topstitching needle because they are made for thicker topstitching thread (note to self!). Sometimes you'll have to loosen the thread tension to get the bobbin and the needle thread to balance out so it's best to practice on scraps first. Also, I personally use all-purpose thread in my bobbin when I topstitch because it feeds better (at least in my machine) than the thick topstitching thread. I think that you're really only supposed to use lighter weight threads in your bobbin case, but consult your manual or your dealer for what is correct for your machine.

Before I close, I'd like to share a few links of things you might find helpful for the sewalong. Here are two articles ~ Making Perfect Pants and Sewing Instructions for Women's Pants. And if you're interested in learning to better fit your clothes to your body shape, I highly recommend two books by Pati Palmer & Marta Alto ~ Fit For Real People and Pants for Real People. Lastly, there are two books I have in my sewing library that are great pants reference books ~ Easy Guide to Sewing Tops, T-Shirts, Skirts, and Pants & Sewing Pants That Fit (this one is a bit dated, but has good information on sewing and fitting pants).

Thank you Joanna for asking me to be a guest. I hope the information I shared will be useful. My best advice is don't think about it too much. I get caught up in thinking too much and sometimes I think the best things happen when you just roll with it and really just sew by the seat of your pant. Happy sewing!

Friday, January 16, 2009

*hole* lotta fixing

Do your kids (in my home read BOYS) come home with jeans looking like this? Mine do and it happen in a matter of a few short weeks. Note the pants on the right were purchased only a few weeks ago!!!


So what's a mom to do short of buying jeans every month and burning a hole in her clothing budget? Well fix them of course! Yes, I do make the boys' jeans myself and those seem to hold up better, but sometimes I just don't have enough time or find them for under $10 and buy them at the store.

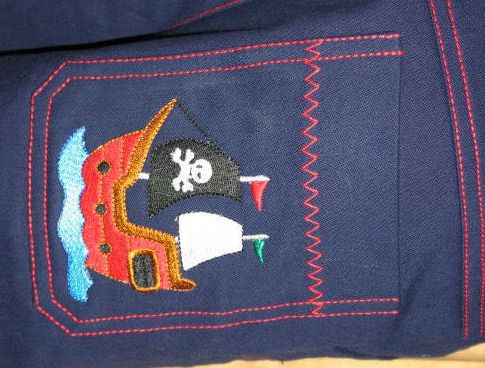
Here are the fruits of my labor. I used my computer program for my embroidery machine and imported a design. Then to make it into a patch, I put an applique shape around it. It was super easy to do. And so I didn't have to unhem the jeans, I removed the inseam or outseam (depending on which seam wasn't double top stitched) from about 1" above the hem to close to the crotch and spread it open so it was flat. Sorry I forgot to take a picture of this step. Then I stitched out the design and sewed things back closed. My boys were beyond thrilled and thought they looked so cool - yay Mom!

I have a HUGE train fan. Anything trains he loves and he adores the Santa Fe diesel. I was snooping around the net and found this little gem for FREE at Ann The Gran ~ just search trains after you log in and you'll see it.

For my middle son I made a dog patch from Embroidables (link opens to the design - not free tho).

Up close and thank you blogger for not turning it the correct way - grr!

And lastly a fire hydrant from Designs By Juju (link opens to the set). This one isn't my favorite one, I mostly don't like the light gray I used. It's a good design, it's just my color choices I don't care for.

The base of each patch is the reverse side of denim. While weeding out the boys' play clothes of what fits whom, I found a few pairs of pants that looked really bad so I just cut them off to make them into shorts. Apparently I'm a little strange because I thought I should save the lower legs of the jeans in case I need a little denim for something. Viola, patches for pants! I figured denim as the base would be more durable than any other fabric I had and I used the back side as a design element.


Now go patch some jeans already!

Tuesday, November 11, 2008

Happy Veteran's Day!

I want to extend my most sincere *thank you* to all our veterans as well as those currently serving in the military. My family doesn't take this duty lightly and we recognize that it is because of these brave men and women that we live in the land of the free and home of the brave. Thank you from the bottom of my heart for your service to our great country!

A few days ago I received a nice surprise in my mailbox. Don't you just love surprises? Well the wonderful folks at Ottobre magazine somehow found out that I'd won the PR Sewing for Children contest and sent me these goodies! Now how sweet was that? All the way from Finland - it totally warmed my heart. Included with the card were three little buttons for my children to wear on their clothes, backpack, etc. and a beautiful 2009 planner/calendar. Thank you Ottobre team!!!!! See I keep telling you all they are so awesome, they seriously have the best customer service and not to mention the best kids patterns.

So my ironing board cover was getting a little ratty. It wasn't that bad, but the ironing board I got came from Wally World. I really wanted an oversized ironing board so I upgraded earlier in the year. I had looked at Bed, Bath, & Beyond, but they wanted like $80+ for the ironing board and I just couldn't see spending that much money. So I happened to be at Walmart (my least favorite store) one day and saw they carried the oversized ironing boards too. I can't recall the exact price, but it was $40 or less. I came with an extra cover which I have no idea where I put. I could have dug around to find it, but I found the cover always wanting to grab what I was ironing and shifting around. Plus the pad it came with is ultra thin. The bottom line was this ironing board needed a makeover!

I have seen others make ironing board covers on their blogs and figured it couldn't be too hard. I found some off white denim in my stash and figured that would be perfect. Durable, yet light colored so I wouldn't get any bleeding of the cover onto a garment (wouldn't that be a nightmare!). Then I picked up a package of 100% cotton batting at Joann's over the weekend.

To make the cover, I first traced around my ironing board leaving a 2" margain around the board (let me say this now, you need more than 2" to do it my way, I think 3" would have been perfect).

Next I cut out my fabric.


Then I serged around the raw edges of the cover so the edges wouldn't ravel. After serging, I pressed a 5/8" SA, stitched the pressed edge down to form a casing in which I fed 1/4" elastic through the casing. I put it on my ironing board and adjusted my elastic to get the fit right. Once I got the length of the elastic where I wanted it, I sewed the ends of my elastic together and closed the casing up.

Lastly, I placed my ironing board upside down again and traced the shape onto the batting. I cut two layers of the batting plus I used the original batting/pad as the bottom layer on the ironing board. I have a total of three layers plus my cover and it seems like the perfect thickness.

Here is the finished board. I would have liked the elasticized edge to go under the board a bit more, so next cover I will trace with a 3" boarder so I have enough extra fabric around the edges. I actually didn't have enough fabric to make it any wider tho since what I had was a small scrap. Oh well, live and learn.

Here is the underside. You can see it's skimpy on the sides, but I got it pulled up more in the front for better coverage of the cover. In all, a quick and easy project, tho I did start it yesterday but was interrupted by having to get the kids from school and take them to swimming lessons.


I hope this inspires someone to make a new cover for their ironing board. Such an easy project!

Saturday, October 11, 2008

Zipper Storage


Last weekend I was doing some organization and came across my box of zippers. It was a steal I found on eBay over a year ago, but the problem since has been how to store them. Until last weekend they were all banded together in a box, but it's a pain to dig through when you need a zipper to find the right color. Racking my brain to figure a better way, it occurred to me to put them on a hanger and band them together by color. They can't fall off the hanger and now I can see what I have very easily.

My zippers are all the same length so I chose to band them together by color, but if you have lots of different lengths you could chose to do sort them by size or color. For now, all my packaged zippers (a bunch gifted to me by my neighbor) are banded (still in the original package) by length and style (regular, metal, & invisible).

Friday, August 22, 2008

Make your own knee patches

So do you have a kid that wears holes in the knees of his pants in no time flat? I do! I have been working on Back-To-School pants for my boys and nothing breaks my heart more than to put my heart and soul into their clothing just have a rip or stain happen right off the bat. I know, I shouldn't be so attached, but I try my hardest to give them RTW look, but made ever so lovingly by mom. Yep, you won't get dorky clothes from me. I may be a sweatshop of labor during the busy season, but my pay in hugs and kisses make it well worth my efforts.

So today I was sewing up my first pair of pant and thinking how thin the twill felt (a remnant I had, no clue what it was from - can you say free pants???). So I pondered for a second, what if I put another layer in the knee area for double layer protection. I called my trusty friend (thanks Kim!) to get her input. The verdict was that two layers really isn't going to help unless I fuse them together. Well we all know necessity is the mother of invention, so I present to you my "custom made" knees patches!

First, I cut a piece of fabric and a piece of Heat N Bond Lite to the size I needed. Then I fused the two together per the package instructions (see below ~ sorry for the side ways picture, Blogger would not cooperate and rotate it like it needs to be, but you get the idea, right?).

Then I removed the backing and fused my "patch" to the knee area of the pants. The pants I'm making have two pleats in the knee area so it's impossible to see where the patch is from the right side. On the right side of my test sample it was hard to detect where I fused the two together as well, but I imagine if you use thicker fabric it might show slightly. Still, a few lines are WAY better than a hole in the knee days after school starts. Here is what the inside looks like after I fused the patch in place.


So there you have it, custom knee patches and my first tutorial! Ain't I something special today? ;-) I'll make sure to let you all know how it ends up working for my boys, but I don't see why it won't work like a charm. :-)